Tables are complicated topic. While they are useful for organizing complicated information, they can problematic if to complex. A complicated table with many columns and rows may look fine on a normal computer screen, but it likely won't responsively work on a tablet or phone screen as easily. As with many things in life, less is more. Whenever possible simplify what needs to shown as much as possible. Cut as much as possible.
While it may be tempting to include as much data as possible, the bare minimum will probably fare better as attention spans continue to shrink in the digital age. You have a short window to communicate, the quicker and simpler the presentation, the better.
Tables are sometimes used for content layout. This can pose issues for accessibility (screen readers for the blind can have issues) so whenever possible such a lout should be kept extremely basic with only a few cells.
Creating a Table
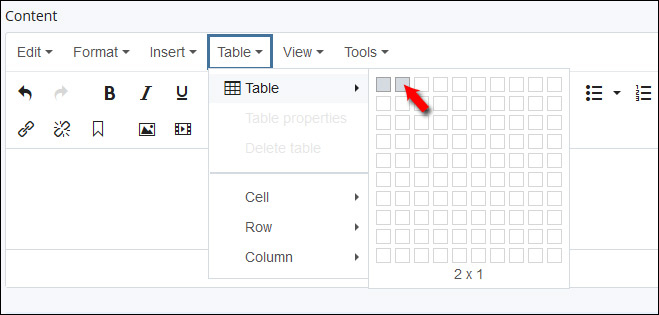
In this example a simple 1 row table with 2 cells will be created. First, place the cursor on and empty line. Then navigate to the Table menu as seen below and click on the desired grid, in this case 1 row with 2 cells.
A table with collapsed cells should be added now. Since the cells contain no content they collapse and can be a bit hard to select later when editing. So I like to use the arrow keys right after creating the table to add placeholder text. The initial selection is the last cell of the table. So I use the arrow keys to move between cells adding a 1 to the first cell and a 2 to the second cell. Then later just replace the placeholder text with the real data.
![]()
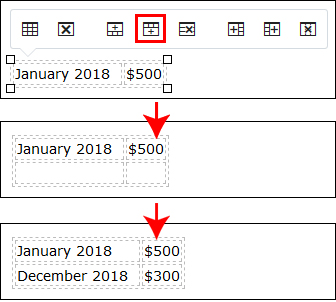
Next, if you need to add another row, place the cursor and choose "insert row after" from the tool palette that is available when working on tables. Then add data to the new row. Repeat as needed.
The Table Tool Palette
Selecting a table, row, column, or cell should cause the tool to appear with additional options for your table.

- Table Options - the key option here is to set width. The width should be set in percents (ex: 100%) rather than normal numeric values (ex: 100). Without the percent sign the width will be based on exact pixels rather than available space. Absolute pixels values will degrade poorly when used on smaller screens (tablets/phones/etc.)
- Delete Table - allows quick removal of the table.
- Add & Delete Rows - add a row above/below current selection or delete the row
- Add & Delete Columns - add a column before/after current selection or delete the column
