Creating an Outline
The outline is used to plan out how teaching and learning will be accomplished in a specific online course. It also serves as a plan of action for the design team, which includes the faculty member, instructional designer, and instructional media specialist.
STEP 1: Your first step is to consider your future students:
- Consider who they are
- Consider what they know
- Consider what you want them to learn and master
- Consider what life experience they bring to the classroom
- Consider their resources
- Consider learning theory
- Consider teaching strategy
STEP 2: Develop your course learning outcomes and module learning objectives. Remember a good learning outcome/objective has a description of performance, condition, and criterion or standard, and lastly, it is observable and measurable. If you need help in finding terms to describe the action you need, refer to Bloom’s Taxonomy of Learning. Terms are defined in domains, to include cognitive, perceptive, and psychomotor.
STEP 3: Plan your assessment methodology, types, frequency, and locations. Keep in mind there are direct, indirect, and self-assessment types and each measures success in a different way and add value in the online environment. There are also many different ways to assess student knowledge to include:
- Discussions
- Assignments
- Quizzes
- High stake exams
- Wiki and blogs
- Flash interactions
- Student presentations
- Student research
- Student papers
- Rubric-based
- Paper-based with proctor or web-based proctored
- Face-to-face, on the ground, or experiential course work (HLC requires that work of this nature must be clearly stated to students in the syllabus)
Lastly, assessments must do three things:
- They must cover course learning outcome
- They must cover module learning objectives
- They must take into consideration the performance, criterion, and condition of each outcome
- Content is information a student must master to meet course learning objectives and module learning outcomes
- Content must provide all the necessary information to achieve objectives/outcomes (keeping in mind some knowledge is fundamental core and part of previous courses, activities, events, and experiences)
- Content leads the user to success in related course assessments
- Examples of content include:
- Syllabus
- Text-based lecture (with mp3 audio, OIT created)
- Recorded lecture
- Audio
- Optional synchronous sessions
- Yuja recordings
- PowerPoint with voiceover
- Video-Professional Source
- Interactive Flash Engagement
- Student created content (Wiki, Blog, presentations, etc.)
- Mashups (YouTube and other sources)
- Diagrams, charts, photographs, checklists, rubrics, and PDF
STEP 5: Plan your required student-to-student and instructor-to-student interactions and collaborations. These can be used to develop student-created content, build connections in content, or develop community relationships (HLC requires course design and delivery to support student-to-student and instructor-to-student interaction).
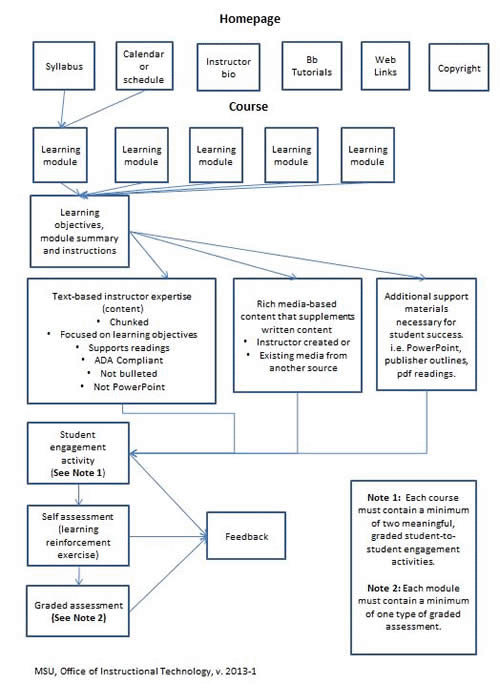
EXAMPLE: An outline example demonstrating the minimum design standards is available below. This will help you to plan out the logical flow of these items in a storyboard fashion. Be prepared to explain and expound upon these features during the instructional design meeting.


