Blackboard Helpful Hints

Our Favorite YouTube Instructor Videos and Help to Start the School Year Off Right

Tip: While watching these videos, have your course open in another browser tab to follow along and immediately apply what you learn.


How to Make Your Course Available to Students (Bb Help)

How to Send Email in Blackboard Learn

How to Create Announcements in Your Course

Automatically Adjust Dates in a Copied Course

How to Edit Your Course Home Page

How to Design Your Course Entry Point

How to Add Content to a Learning Module

How to Create a Mashup

How to Turn Tools on and Off in a Course

How to Create a Rubric for Grading Student Work

How to Grade Using a Rubric

How to Add a Tool Link in Your Course

How to Create a Smart View of Grade Center Data

How to Customize the Grade Center

Attaching Files from Course Files in Blackboard

How to Create a Test Question

How to Build a Pool of Test Questions

How to Create a Random Block of Test Questions

How to Create a Test in Blackboard Learn

How to Export and Import a Test or Survey

How to Set Test Options

How to Quickly Jump from One Blackboard Course to Another

How to Create a Lesson Plan

Create Learning Modules (Bb Help)

New Functionality – Attendance

Many instructors use attendance data as part of their students' overall grades. Also, some institutions and programs have attendance policies that require instructors to track the number of class meetings students have missed. For each class meeting, instructors can mark whether a student is present, late, absent, or excused. The attendance records for each student appear in a single column next to other grades. On the Attendance page, profile pictures appear so instructors can easily identify students. So where is this new Attendance module? Visit Course Management, Course Tools, Attendance. For more information on specific features of Attendance visit this Blackboard Help site:
https://help.blackboard.com/Learn/Instructor/Grade/Attendance

Adaptive release can make your course more engaging by releasing content under specific conditions. The instructor controls the content release by one of the following criteria:

Content can be released based on rules set by the instructor. There are two types of adaptive release rules:

Criterion

Displays

Example

Date

On a date, until, or between specific date/times

When content needs to be released after topic has been discussed in class

Membership

Specific user(s) or groups.

Release different assignments to groups

Grade

Gradable item was attempted or a certain score was met, less than, equal to, or between.

Provide different material for student who earn 70% or higher OR 68% or lower

Review Status

When content item is marked as reviewed.

Release first unit only after the syllabus was marked reviewed.

adaptive release steps graphic


Basic: One rule that can have multiple criteria.

Example:  Set a rule that requires a student to meet both date and review status criteria before the content becomes available.


Advanced: Multiple rules for a single content item.

Example:  Set up a rule for Group Blue allowing users to review Test 1 after assignment A is completed, while another group, Group Red needs to complete assignment B first.


By using adaptive release, you are tailoring the content to the needs of individual students.   Adaptive release works well to prevent students from working ahead – so each unit or module is released at a specific time.  Some instructors create additional course material to use for remedial purposes – setting the release of support resources if a student receives a low grade.  It can also be used to ensure students read material prior to taking a quiz.

film reel graphicFor more information, watch this video.

Allowing Retakes – Clearing Students Attempts

If a student experiences a technical problem or needs an additional attempt, you can clear the test attempt. The submission is cleared from the Grade Center and the student can retake the test.

  • In the Grade Center, locate the cell containing their attempt, then click the chevron to View Grade Details.
  • On the Grade Details page, select Clear Attempt.
  • Select OK to confirm and remove the attempt.
  • On the Grade History tab, the action is recorded with "Attempt Grade Cleared." In the Grade Center, no grade or icon appears in the student's test cell.

Submit a Test for a Student

If a student was unable to submit a test but completed the work, you can submit the attempt so you can grade it.

  • In the Grade Center, locate the cell that displays the In Progress icon.
  • Access the cell's menu and select View Grade Details.
  • On the Grade Details page, select View Attempt.
  • Be sure the answers were saved.

If multiple questions are marked with no answer, you can clear the attempt. The student needs to take the test again.

  • Select Test Information to expand the section.
  • If you're satisfied with the student's test attempt, select Submit Attempt.
  • Select OK to confirm the attempt submission.

Test Access Log

Instructors and other users who are granted permission can view a test attempt's Access Log for a list of times of various student interactions with the test. The log can help to confirm whether a student began a test or ran into problems during a test.

  • On the Control Panel, expand the Grade Center section and select Tests.
  • Locate the cell for the student's test that you want to investigate.

The cell must contain either a grade or the Needs Grading icon for an access log to be generated. If you submitted the test for the student, an access log isn't generated unless the student selected Save All Answers.

  • Access the cell's menu and select Attempt.
  • On the Grade Test page, expand the Test Information section.
  • Select Access Log.

Sorting in the Grade Center

Sorting can give you a quick glance of highest to lowest scores on a grade item or change the order of the Grade Center by first name instead of last name. To do this, click the column title or caret in the column heading.

sort-grade-center-graphic.jpg

Columns can also be sorted or grouped by:

  • Categories
  • Due Date
  • Date Created
  • Points Possible
  • Column Display Name

On the Action Bar, point to Sort Column By and select a column sort option. When you close your browser, the sort order reverts to the default which is the Layout position.

Course Reports

You can run several types of course reports to view information about course usage and activity. You can view summaries of course usage such as which course areas are used most frequently and course access patterns for specific students.
Report data is automatically refreshed every 20 minutes for all reports except activity reports. Activity data is refreshed once per day at midnight. 

How to Run a Course Report

  • In your course, expand Control Panel if necessary, click Evaluation then Course Reports.
  • Nine default reports will display. Find a report you wish to review, click the down arrow and choose Run.
  • Specify a start and end date, and other parameters if prompted. Choose Submit.
  • Blackboard will process your request. You can save the report to the Content Collection, download the report or you can run another report.

In the Grade Center, you can provide extra credit to students in three ways:

  • Extra credit for the total column
  • Extra credit for a weighted total column, category
  • Add Extra Credit Points to the Overall Grade

Extra credit for the total column

You can create an extra credit column in the Grade Center with a maximum score of 0 that is included in the default Total column computation. Then, you can assign extra credit points as needed.
This method works for only one individual extra credit column where grades aren't weighted.


Example: Columns in the Grade Center

Column

Points Possible

Assign 1

10

Assign 2

10

Essay

50

Test

30

Extra Credit

0

Total

100


Create an extra credit column

  1. In the Grade Center, select Create Column.
  2. On the Create Grade Column page, provide the appropriate information.
  3. Select Score from the Primary Display menu.
  4. Select Percentage from the Secondary Display menu.
  5. For Points Possible, type 0.
  6. Select Yes for Include this Column in Grade Center Calculations.
  7. Select Submit.

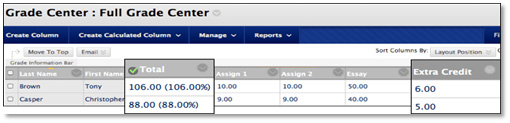
The extra credit column appears in the Grade Center. After you add points in an extra credit column, a student's total points can equal more than 100 percent. If a student receives full credit for all gradable items (100 points) and also receives 6 extra credit points, the result is 106 out or 100 or 106%.

grade-center-graphic.jpg


Extra Credit for a Weighted Total Column

The weighted total column generates a grade based on the result of selected columns and categories, and their respective percentages. When you create a weighted column, you can include other calculated columns and other weighted columns. Your options are to add extra credit points to a category or to the overall grade.

Extra credit when weighting grades—added to a category

Example
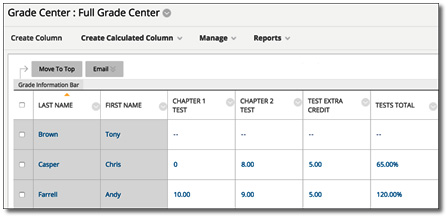
You want to add 5 points extra credit to tests. In the Grade Center, create an extra credit column worth 0 points. After adding the 5 points for each student to the extra credit column, create another column to calculate the combined test grades total. The “Tests Total” column includes any columns that include test grades and the extra credit column. When you create the weighted total column, instead of adding the category "Tests" worth 20%, add the “Tests Total" column for 20%.
  1. In the Grade Center, select Create Column.
  2. On the Create Grade Column page, provide the appropriate information for a tests extra credit column.
  3. Select Score from the Primary Display menu.
  4. For Points Possible, type 0.
  5. Select Yes for Include this Column in Grade Center Calculations.
  6. Select Submit.

Create another column to calculate the total of the tests columns and the tests extra credit column.

  1. full-grade-center-graphic.jpg
    Select Create Calculated Column to access the menu and select Total Column.
  2. Provide the appropriate information and a name such as “Tests Total.”
  3. Include the test columns and the tests extra credit column.
  4. Select Percentage from the Primary Display menu.
  5. Select Submit.

For your weighted total column, check that the "Tests Total" is the column that's being weighted and not the category “Tests.”

Add Extra Credit Points to the Overall Grade

  1. In the Grade Center, select Create Column.
  2. On the Create Grade Column page, provide the appropriate information for an extra credit column.
  3. Select Points from the Primary Display menu.
  4. For Points Possible, type 0.
  5. Select Yes for Include this Column in Grade Center Calculations.
  6. Select Submit.

In the Full Grade Center, create a "Final Total" column that includes the "Weighted Total" and the "Extra Credit" columns.

Assignment Submission Receipts

The Review Submission History page contains information about student’s submitted assignments along with a success message and confirmation number. Students can copy and save this number as proof of their submissions and evidence for academic disputes. For assignments with multiple attempts, a different number is assigned for each submission.
You access submission receipts through the Grade Center. Click the Reports menu and choose Submission Receipts. Provide search information for the student’s name and click Go. (Note: submission receipts not available for exams.)

submission receipts sample 

Helpful Web 2.0 Tools

Web 2.0 is an older term that describes participative internet technologies. Like YouTube videos, some of these can be integrated into your course site or be used to assist teaching. Some tools come with ads, require an account, or may charge for added features. Here’s a list of some helpful tools that you might embed into your course site or use to supplement instruction. 


Tool

What it Does

Issuu.com

Upload PDF file to create an interactive, page-turning file. You can distribute, measure, and even monetize your digital content.

CuePrompter.com

Turns your browser into a teleprompter.

Online Stopwatch

Use your browser as a stopwatch.

Web Poster Wizard

Create a lesson, worksheet, or class page and immediately publish it online.

Mindomo

Turn information into diagrams and mind maps for more instant understanding of concepts.

Verse

Create immersive interactive videos. Easy to use templates. Videos can be embedded.

PortfolioGen

Free online portfolio website. Great for creating educator portfolios.

Sway

This Microsoft tool is available through your Office 365 account. Create and share interactive reports, presentations, personal stories, and more. 

Forms

This Microsoft tool is available through your Office 365 account. Create surveys, quizzes and forms. When presenting in a large classroom or auditorium, you can display a QR code which students can scan with their phones and respond to questions.  

test-availability

Scoring Tests with Multiple Attempts

Not all students will choose to take a test more than once when multiple attempts are provided as an option. For some students however, it can provide added learning opportunities. When multiple attempts is selected, you can select which attempt's score to use in the Grade Center from the Score Attempts Using menu. Options include:

  • Last graded attempt
  • Highest grade
  • Lowest grade
  • First graded attempt
  • Average of Graded Attempts


Restricting Test Location

You can require students to take a test or survey in a specific location such as a computer lab. Students outside of this location won’t be able to take the test or survey.

This option is based on a range of IP addresses created by your institution. If your institution hasn't created this range, this option doesn't appear.

IP addresses identify specific computers and are a good method to enforce location restriction requirements. On the Test Options page, select a location from the Restrict Location menu.

At times, you might need to allow a student or a group of students to take the test from somewhere outside of specified location (IP range). In this case, you can use the Test Availability Exceptions to exclude specified students or groups of students from the location restriction.

Students with this exception enabled can take the test from any location, even if the test has the restriction for other students.

In a high-stakes testing situation, you or the proctor can override a restriction that has been enforced by the system. On the Test Begin page, you can see the individual instances when students were prevented access to a test. You will also see an option to override this restriction to allow a student to continue the test.

These restrictions are logged by the system in the event that later review is required.

Group Enrollment Methods and Best Practices

When you create a group or set of groups, you can select group members in these ways:

  • Manual enrollment - allows you to assign each student in your course to a group. Manual enrollment is available for both single groups and group sets.
  • Random enrollment - Random enrollment is available only for group sets and automatically distributes membership into groups based on a designated number of students per group or the designated number of groups.
  • Self-enrollment - Self-enrollment allows students to add themselves to a group using a sign-up sheet. You can make sign-up sheets available to students on the groups listing page or add a link to a course area.

Blackboard Best Practices for group membership recommends including at least four members in each group. Four-member groups can accommodate an absence and the group can continue to move forward. This size doesn't permit any student to lurk. Group members can distribute tasks evenly. Four members bring enough diversity, opinions, and learning styles for worthwhile brainstorming and solutions.
For large classes, consider using tools like Tegrity and VoiceThread for groups to record their presentations outside of class. This provides instructors with more class time and it can make assessment more precise by allowing instructors to grade at their leisure. Students can use these tools to evaluate their peers as well.

Force Completion vs. Auto Submit

Force completion and auto submit are two options with tests. Here are the differences:

Force Completion
Off: students who exit the test before they have finished can resume where they left off. This ensures they can recover from connection problems. The counter continues counting while they are gone from the test, the questions they see and the answers they provided are still the same when they return. On: students must contact you to reset the test so they can access it.

Recommended setting: Off

Auto Submit
When turned on, that forces “pencils down” at the end of the timer period. Auto Submit submits the test as it is when the test timer expires. If you leave it “off”, then students can take more time. Those tests and surveys are flagged as submitted after the timer expired; you must manually adjust grades for late marks.

Recommended setting: On


Force completion settings example graphic
Helpful websites:
ClearYourCache.com
RefreshYourCache.com


Best Practice: Interactive Tools for Online Courses

To build a successful online community, students need the tools to interact and have conversations. Students report that their satisfaction with online courses relates to instructor presence and the collaboration and sense of community they experience. Collaboration exists when students interact and direct their efforts toward a common goal.
Blackboard Learn offers four communication tools to allow you to provide rich assignments and evaluate students in authentic ways where students can share and create knowledge. Here are some examples for using tools to promote interaction. Keep in mind these tools can be used in combination:

Journals
  • Ask students to record observations.
  • Question the content.
  • Identify areas for help.
  • Develop a plan for improvement.
  • Set goals.
  • Evaluate their educational journeys.
  • Submit prewriting for a graded assignment for guidance and feedback.
Discussions
  • Ask students to record observations.
  • Question the content.
  • Identify areas for help.
  • Develop a plan for improvement.
  • Set goals.
  • Evaluate their educational journeys.
  • Submit prewriting for a graded assignment for guidance and feedback.
Blogs
  • Interpret a case study.
  • Submit the final draft of a written, graded assignment.
  • Analyze a topic, adding information over several weeks or the entire term.
  • Deliver arguments and supporting evidence.
  • Provide commentary on a subject.
Wikis
  • Class summaries and outlines.
  • Course glossary.
  • Resources repository. Ask students to post links to pictures, articles, and media files that relate to the lesson.
  • Lab experiments.
  • Group project presentations.
  • Research notebooks.
  • Connecting student writing to form student solutions for scenarios and case studies.
  • Final test reviews.